CAR SPEAKERS HOW TO INSTALL
MODIFYING
A CAR DOOR TO FIT
FULL RANGE SPEAKERS
Modifying your door to accept speakers requires
ingenuity and labour, but allows you to position
the speaker at a location you prefer. You also
can usually choose whether to top-mount or
bottom-mount your speaker. (Top mounting tends
to be easier and requires less mounting depth.)
This work involves cutting metal, plastic,
and/or fabric. (Note: Component speaker
installations typically make use of the factory
speaker location to mount the woofer. The custom
installation of the tweeter and crossover is
covered on page 3).
To find the best location for your speakers,
look at the template that comes with them.
You'll find it with the instructions, or printed
on the box. Place the template over the
potential mounting areas and observe any
obstructions behind the surface (such as
interior door parts) or obstacles (such as an
irregular mounting surface).
When you examine the surface you're about to
cut, make sure that the installation won't
affect other mechanisms. In particular, check to
ensure that the speaker and grille will not
interfere with the window and crank. Look at the
clearance with the window rolled down. If it's
close, roll the window up and down before you do
anything permanent. Also, close the door. The
mechanism that holds the door open can intrude
into the speaker cavity.
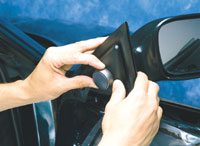
Check behind the door panel to see how much
metal you need to cut from the door frame.
Locate the speaker mounting position on the back
of the door panel. Tape the template on the
exact spot and trace the inside edge with a pen.
Lay the panel flat on a clean surface and cut
out the circle with a sharp utility knife. Be
patient. A dull blade or too much haste might
rip the fabric.
Cut your metal using a jigsaw, but be careful
here. You need to wear eye protection, and cut
very carefully to make sure you don't mar or rip
the surface. Don't cut through the door panel
and metal at the same time. If you try to cut
both layers at once, you might rip the panel
covering. When cutting exposed metal or metal
covered by a plastic panel, wrap the base of the
saw with electrical tape to prevent marring.
Also, keep the blade clear from the car's
exterior, where it could cause pockmarks. Vacuum
the debris when you are finished.
Connecting the
full-range speaker in your modified door
You might need to do a little extra work to
connect the speaker you've installed in a
non-factory location in your door. Start the
wiring process by using the factory rubber
tubing between the door and the door jamb to run
speaker wires from the door into the car body.
(If needed, you can get some from the car dealer
or a junkyard.)
If you don't see a factory boot or plug, use a
drill to create a 5/8" hole. Make sure the hole
gets you to the desired speaker location.
Sometimes, structural steel supporting the
hinges will isolate this edge of the door.
Protect the wiring from the sharp edges of the
holes with a rubber grommet, several layers of
electrical tape, or flexible tubing run between
the two holes. This will keep the insulation
from becoming cut or worn when you open the
door. Also, position the wire where it won't be
pinched by the hinge or a portion of the door
jamb. Leave enough slack so the door can open
all the way.
If your new speaker is designed to be
top-mounted, you can replace the door panel
after you run the wire through the jamb. (If
you're using bottom-mount speakers, attach the
speaker to the panel before you reassemble the
door.)
When the door panel is properly positioned, push
the friction fittings back into their seats and
replace enough of the screws, armrest, etc., to
hold the panel loosely in place. Do not clip on
the window crank, since you might have to remove
the panel again.
Hold the speaker in its new home, mark the screw
holes and remove the speaker. Drill the holes.
Crimp quick-slide terminals onto your speaker
wire and connect the wire to the speaker, noting
the proper polarity. If you can, use "speed
clips" over the new screw holes. Speed clips are
slotted pieces of metal through which you drive
the screw. They give the screws something extra
to hold on to, providing support when the door
is slammed.
After you've attached both speakers to the
panels, connect your wires to your receiver or
amplifier and listen to some music. If they work
properly, finish re-attaching the panels, window
cranks, door handles, and trim pieces.
Installing rear
speakers
Again, speakers labelled "E-Z" by our Vehicle
Selector will fit in the factory speaker
openings and use the factory grilles and
brackets. Installing "E-Z" rear speakers is much
like installing "E-Z" door speakers. You'll
follow the same basic steps:
remove the factory grilles
- unscrew the factory speakers
- unplug the factory speakers and plug in
your new ones
- then reverse the procedure to mount your
new speakers
Some rear speakers fit into specially molded
speaker housings or wells. For example, many GM
models include under-deck speaker hangers
designed for factory 6"x9" speakers. Your
Crutchfield MasterSheet instructions will detail
how to install speakers in these locations.
|
|
|
|