 |
1.
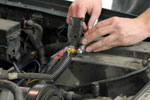
Disconnect the Battery — Your car
doors are going to be open while you
install the new speakers. Disconnecting
the negative terminal of the battery
prevents you from draining your battery
and getting stuck without power. It also
safeguards you from risking a dangerous
short circuit in your vehicle's
electrical system.
|
2.Pre
prepare parts— Take out all the
hardware from the box your speakers came
in. If you're installing full-range
speakers, you'll typically have the 2
speakers, speaker wire, mounting screws,
speed clips, and instructions. Some
aftermarket speakers include grilles as
well; if your speakers do not come with
grilles, use your factory grilles. If
you're putting in component speakers,
you'll also have the separate tweeters,
the tweeter mounting hardware, and
crossovers.
If you are installing component
speakers, start thinking about where to
install your tweeters, and what type of
mounting you want to use (angled, flush,
or surface). You'll want to locate the
tweeters above the woofer and "aim" them
up at your ears to achieve a realistic
soundstage and stereo image. But you
don't want to install the tweeter too
far from the woofer — ideally, the
tweeter should be no more than 1-foot
from the woofer to maintain a unified
sound field. Of course, the dimensions
of your door and aesthetic
considerations will also factor into
where you wind up mounting the tweeter
in your vehicle.
|
 |
3.
Door Disassembly — Depending on
where your factory speaker locations
are, or where you've decided to
custom-mount your speakers, you can now
begin to uninstall your old speakers.
Your MasterSheet™ instructions will
detail how to remove your factory
speakers. In this example, the Ranger's
front speakers are located in the front
doors.
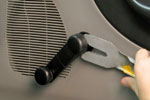
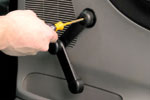
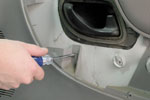
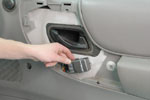
To begin, we used a window crank removal
tool to pry off the crank cover. Then,
we removed a Torx T-20 screw and removed
the window crank.
|
 |
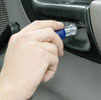
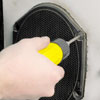
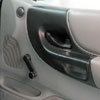
Next, we
removed a philips screw from the lower
rear corner of the door panel, and two
philips screws from the door pull cup.
The door pull cup then pulled right off.
|

 |
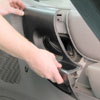
There was one
more philips screw beneath the door pull
cup to remove. Then we slid the door
panel up and off the door.
|
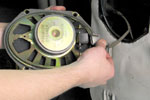 |
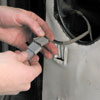
4.
Removing the Factory Speaker — The
factory speaker is secured to the car
door with four philips screws. We took
out the screws and pulled the speaker
out of the speaker opening. Using a flat
head screwdriver, we popped off the
factory harness and removed the
"Premium" factory speaker.
|
 |
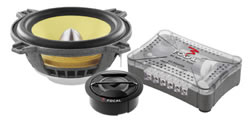
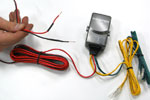
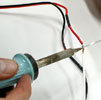
5.
Prepping the Crossovers — Because
component speaker systems use an
external crossover to divide the
frequency bandwidths between the tweeter
and woofer, we needed to solder the free
Crutchfield wiring harness to the
crossover's input wires. We cut off the
wiring harness' quick slide connectors
and stripped the wires. We also stripped
the crossover's input wires and placed
some heat shrink tubing on them before
twisting them together with the wiring
harness wires.
|
 |
After
soldering the wires together, we used
the heat gun to melt the heat shrink
tubing and protect the connection. Then
we connected the crossover to the
factory wiring with the quick connect
wiring harness.
|
 |
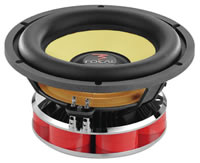
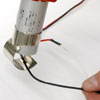
6.
Installing the Woofer — The 1996
Ford Ranger uses a 6"x8" speaker in the
front doors; but the Blaupunkt component
system we purchased has 5-1/4" woofers.
Using the free Crutchfield speaker
bracket, we can adapt the 6"x8" factory
speaker opening to accept a 5-1/4"
woofer. We used the factory speaker
screws to secure the mounting bracket to
the factory speaker opening.
|
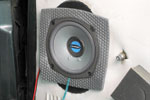 |
Then we
placed the baffle in the bracket and
screwed in the woofer. (If we had been
installing full-range speakers, we'd now
reverse our steps and reattach the door
panel, and be done.)
|
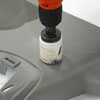 |
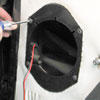
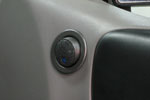
7.
Installing the Tweeters — We chose
to angle-flush mount the tweeters.
Acoustically and aesthetically, this is
usually the best way to mount component
tweeters. However, angle-flush mounting
requires you to drill a hole in your
door panel large enough to accommodate
the entire tweeter cup.
After determining where to mount the
tweeter and tracing around the tweeter
cup with a pencil on the door panel, we
used a serrated circular blade on our
power drill to cut out a hole for the
tweeter.
|
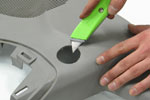  |
We trimmed
the cutout with an exacto blade. Each
manufacturer has a different system for
securing the tweeter to the mounting
surface — Blaupunkt's Multi-Mount system
uses a spring clip that attaches to the
back of the tweeter with a screw to
achieve a tight, secure fit. We angled
the tweeter up and in towards the
driver's seat for optimal imaging.
|
 |
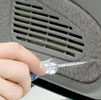
8.
Completing the Installation— We
connected the woofer and tweeter leads
to the crossover with the attached quick
slides. We used the included wire ties
to gather excess cable and routed the
speaker wires around the window crank.
Then we dropped the door panel back onto
the door.
|
 |
| The crossover
fit snugly between the door panel and
the door frame, so we simply dropped it
in. Then we replaced the screws, the
door pull cup, and the window crank. Now
we have full-bodied, detailed sound, a
deep and spacious soundstage, and
vibrant stereo imaging — what a
difference! |